Homesteading
Homestead Hacks – Ten Creative and Practical Up-Cycling Projects that Cost Almost Nothing
Introduction
Most homes have unused household items—from broken appliances to forgotten backyard amusements—taking up space. With a little inspiration, these items can become practical tools instead of landfill waste. That DIY spark is what this post delivers. These up-cycling projects transform discarded materials into useful tools, requiring no expensive supplies or special skills—just know-how and a sense of adventure.
Whether you’re a homesteader, a gardener short on space, or simply want more independence, you’ll find solutions here. This article presents 10 actionable builds with step-by-step instructions, common pitfalls to avoid, and seasoned advice.
These projects do more than repurpose old lumber for decoration—they provide practical tools for self-sufficiency, covering food storage, gardening, and livestock. Using materials most people would discard, they’re ideal for anyone eager to spend a weekend learning new skills and seeing what’s possible as a builder.
Contents
- Make a Fire Drum from a Washing Machine 🔥
- Make a Vertical Garden from a Shoe Organizer 👞
- Make a Vertical Farm from Rain Gutters 🌧
- Make a Root Cellar from an Old Chest Freezer 🥕
- Make a Worm Composter from an Old Bathtub 🛁
- Make a Bee Hotel from Old Lumber 🐝
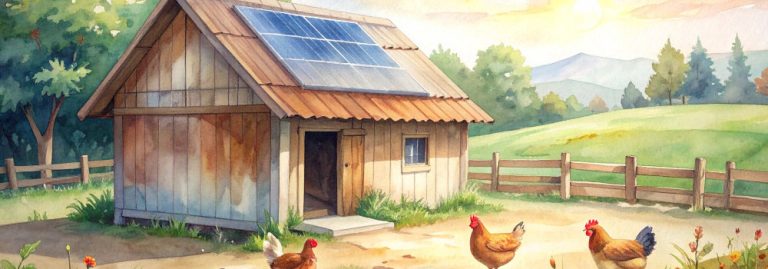
- Make a Chicken Run from an Old Trampoline 🐓
- Make a Chicken Tractor from Old Pallets 🚜
- Build a Greenhouse from Reclaimed Windows 🥬
- Build a Greenhouse Wall from Jars or Bottles 🍾

Turn an Old Washing Machine into a Backyard Fire Drum
Store-bought fire pits can be expensive. But a salvaged washing machine drum is free and burns better. The built-in perforations create natural airflow for a hotter, cleaner fire. The stainless steel design also resists corrosion for years of use.
This satisfying weekend project produces a durable fire pit that also serves as an off-grid cooking station. Add a grill grate, and you’re ready to cook.
How to Build It:
- Disassemble the washing machine and remove the inner drum (1–2 hours).
- Clean off any plastic or rubber, and grind down sharp edges.
- Elevate the drum on bricks or a metal frame for airflow.
- Do a test burn first to clear any residue before cooking over it.
Important: Be sure to remove all residues and plastic components, and avoid toxic materials like galvanized metal and pressure-treated wood. Also, ensure the drum is mounted on sturdy legs and keep a ten-foot buffer zone around any open flames.
For a detailed setup guide, check out this blog.
Make a Beautiful Vertical Garden from Discarded Household Items
Limited space shouldn’t hinder growing herbs or vegetables. Make a vertical garden using items like a hanging shoe organizer or repurposed bottles. Grow herbs on any wall or fence—ideal for urban homes.
This type of setup can be used for culinary herbs, leafy greens, green onions, strawberries, and other plants with shallow roots. Or create a beautiful living wall with decorative plants like petunias or succulents.
This project combines creativity, function, and sustainability. It can be ready in about two hours, costs nothing if you have the materials, and enhances air quality and aesthetic appeal.
How to Build It:
- Pick a spot with 4–6+ hours of sunlight (a wall, a fence, or a balcony).
- Add drainage holes to your containers.
- Hang securely using hooks, nails, or a sturdy frame.
- Fill each pocket or bottle with potting mix (leave a little space at the top).
- Add seedlings or seeds. Water and test drainage.
Pro Tip: Bottom pockets in a shoe organizer tend to get waterlogged since water trickles down from above. Plant drought-tolerant herbs like thyme or oregano at the top, and moisture-loving varieties like basil at the bottom.
See more vertical garden designs here.
Create a Zero Footprint Vertical Farm from Repurposed Gutters
If you’re installing new rain gutters, the old ones can be mounted to a fence or frame to create a productive growing system for herbs and greens with minimal space. It works on balconies and house sides alike.
If you don’t have any, metal or plastic gutters are often available second-hand. Reserve 3–5 hours, depending on the number of tiers and the complexity of your setup.
How to Build It:
- Cut gutters to your desired length — a hacksaw handles plastic easily, a metal blade for aluminum.
- Drill small drainage holes every 6–8 inches along the bottom to prevent waterlogging.
- Snap or screw end caps onto both sides to keep soil in place.
- Mark your mounting positions on the wall or frame using a level — even a slight tilt causes uneven watering.
- Secure brackets firmly into wall studs or a sturdy timber frame; gutters filled with wet soil are heavier than they look.
- Fill with quality potting mix, plant up, water thoroughly, and check drainage is working before walking away.
Important: If you’re growing edibles, use only food-safe materials. Some older or industrial-grade PVC gutters contain additives you don’t want near food crops. New vinyl or aluminum gutters are the safest choice. Also, ensure every tier is securely anchored; a full gutter pulling away from a fence can cause real damage. In exposed spots, add wind protection or mount on a sheltered side of the property.
Pro Tip: Stagger your planting across tiers so taller plants don’t shade the ones below. Put compact herbs and strawberries on the lower runs, and fast-growing leafy greens like lettuce and spinach at the top where light is strongest. You’ll get more out of every square inch.

Turn an Old Chest Freezer into a Power-Saving Root Cellar
This project lets you store food sustainably, using an old chest freezer as a passive cold-storage unit requiring no electricity. It can keep produce like potatoes and apples fresh for months.
Placement and drainage matter most. Get these right and your broken freezer becomes reliable cold storage.
How to Build It:
- Choose a shady, well-drained spot — avoid low-lying ground where water pools.
- Drill 1–2 ventilation holes in the freezer to prevent mold.
- Dig a hole slightly larger than the freezer, leaving the lid just above ground level.
- Add 4–6 inches of gravel at the bottom for drainage.
- Backfill tightly around the sides and cover the lid with straw or a wooden board.
Important: In very cold climates, contents can freeze solid in winter. Layer straw on top of the lid and inside the freezer to regulate the temperature and protect your produce.
Click here for a step-by-step guide with photos.
Turn an Old Bathtub into a Vermiculture Composter
Vermicomposting turns kitchen scraps into high-quality compost with minimal maintenance. An old bathtub or laundry tub makes a perfect large-capacity worm farm with built-in drainage.
To set this up, you’ll need to build a wooden or brick frame to hold the tub off the ground and cover the drain hole with mesh or landscape fabric. You’ll also need some form of bedding, such as cardboard, leaves, shredded paper, or coconut coir. If you don’t have access to compost worms, such as red wigglers, they are readily available online. If you’re new to composting, you can learn all about it from this book.
Set up in a cool, dark place, feed regularly, and harvest free compost and fertilizer in a few months.
Important: Never add meat, dairy, or oily foods to your worm farm — they attract pests and create odor. Stick to fruit and vegetable waste, coffee grounds, and torn-up cardboard. Your worms will thrive on it.
Attract More Pollinators with a Reclaimed Bee Hotel
If you have unused lumber going to waste around your property, why not put it to use by building a hotel?
Solitary bees, such as masons and leafcutters, are great pollinators. They don’t sting or swarm. A bee hotel made from scrap wood or bamboo provides them with the nesting space they need.
More pollinators mean bigger harvests and a healthier garden. It’s good for the environment and saves labor.
How to Build It:
- Build or reuse a simple wooden box frame about 4–6 inches deep.
- Cut bamboo or hollow stems to fill the frame, or drill holes (3–10 mm) into wood blocks.
- Sand all openings smooth — rough edges damage bee wings.
- Pack the structure tightly and mount it 3–6 feet off the ground, facing south or southeast.
Important: Replace or clean your bee hotel materials every year. Old, damp nesting tubes can harbor mites and fungus that harm the very bees you’re trying to attract. A quick annual refresh keeps populations healthy.

Make a Chicken Run from an Old Trampoline
Trampolines are common in many backyards. But when the kids outgrow them, the sturdy circular frame can be repurposed as a low-cost, durable chicken run. This gives your flock secure shelter while saving you the high cost of store-bought fencing, and helps extend the trampoline’s useful life.
The jumping mat acts as a built-in roof, providing shade and protecting poultry from aerial predators. The elevated structure allows natural airflow, preventing heat stress and creating a safe, comfortable, and spacious environment for your flock.
Important: Chicken wire keeps chickens in — but it won’t stop a determined raccoon, fox, or weasel. Spend the extra money on hardware cloth (welded wire mesh) instead. It’s the single most important upgrade for predator-proofing any run.
Check out this guide for more tips and images.
Turn Old Pallets into a Mobile Home for Your Chickens
A chicken tractor is a movable coop-and-run combo that lets your flock forage on fresh ground every day. Move it daily, and your chickens naturally fertilize and cultivate the soil — turning your yard into a rotating garden bed. You’ll benefit from the free labor, and your hens will be healthier and happier.
Pallets are one of the most versatile free building materials available. With 3–6 pallets, some hardware cloth, and a weekend, you can have a fully functional mobile coop.
How to Build It:
- Check pallets for the HT stamp (heat-treated) — avoid any marked MB (methyl bromide treated).
- Frame your design — an A-frame or a simple box both work well.
- Cover all sides with hardware cloth, secured with screws and washers (not just staples).
- Add a small door with a proper latch — raccoons can open simple hook-and-eye closures.
- Attach wheels to one end and a handle to the other for easy daily moves.
Important: Move the tractor to fresh ground every single day. Leave it in one spot for more than 2–3 days, and you’ll end up with bare, nitrogen-burnt patches instead of improved soil.
Check out this guide for a basic plan
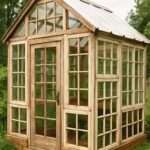
Create a Beautiful and Affordable Greenhouse from Reclaimed Windows
Old windows are one of the most thrown-away building materials out there — and one of the most useful. A greenhouse built from salvaged windows can extend your growing season by 6–8 weeks on both ends, giving you earlier starts in spring and fresh greens well into autumn.
The build takes a weekend or two, depending on size, but you end up with a beautiful one-of-a-kind structure you can take pride in.
How to Build It:
- Collect windows of similar sizes — consistency makes building much easier.
- Build a sturdy timber base frame sized to match your window collection.
- Stand windows upright and secure to the frame with screws and L-brackets.
- Fit a polycarbonate or corrugated panel roof for durability.
- Seal all gaps with weatherproof caulk and add a vented door for airflow.
Important: Test older windows for lead paint before building. A simple lead-test swab (available at hardware stores) takes two minutes and could save you from a serious health hazard. If paint tests positive, seal it thoroughly or strip it first.
Check out this simple build with pictures for some inspiration.
Build a Beautiful Greenhouse Wall from Jars or Bottles
This project is sure to get a reaction from friends and neighbors. A wall built from wine bottles set in mortar or cob filters light beautifully, adds thermal mass, and turns hundreds of bottles that would go to waste into a lasting structure. It’s a visually striking addition to any garden — and it works great for either a greenhouse or garden wall.
It takes patience and a lot of containers, but the result is something genuinely unique. Start saving now and build when you have enough.
How to Build It:
- Collect bottles of consistent size — mixing sizes makes stacking unpredictable.
- Build a supporting timber frame first. Bottle walls are not load-bearing on their own.
- Mix mortar (or cob for a more natural finish) and lay bottles neck-to-neck in rows.
- Check for level constantly — crooked rows compound quickly.
- Seal all joints once cured and ensure roof ventilation to prevent overheating.
Pro tip: Green wine bottles diffuse the most pleasant light and stay cooler than clear glass. If you’re building a greenhouse wall, lean toward green or blue bottles on the south-facing side to reduce summer heat buildup.
Conclusion: Up-cycling Projects – Benefits and Cautions
Chances are, there’s one item in this list you’ve thrown out in the past. There’s no special carpentry or engineering skills needed to get started — it’s just learning to see potential in discarded materials. Once that switch flips, you’ll never look at a curb pile the same way again!
If you prefer polished setups, these quirky projects might not appeal. They emphasize function and simplicity, adding resiliency and efficiency to your garden or homestead. Using low-tech principles such as drainage, natural cycles, and passive energy is key to off-grid success.
Remember that while giving new life to old things is a great feeling, not all materials are appropriate for up-cycling. Avoid chemically treated wood around food crops and animals, as well as cracked or unsafe materials. Use better materials where it matters, like keeping your chickens safe from predators, and be aware of safety issues like unstable structures, sharp edges, and flammable materials.
In an age of rising costs, learning to make old things practical and productive is not only an interesting hobby but a path to greater security and prosperity.
Want More Homestead DIY Ideas?
Check these related guides on off-grid food storage, and simple DIY solar power projects.